New codec on the block – recording failures and CUCM 11.x

The inspiration for this post comes from spending way too much time trying to solve an issue that would have taken only minutes had I been aware of the key information I’m generously bestowing upon my fine readers today.

The problem started with reports that just 8841 phones weren’t successfully recording. I happened to have a spare 8841 phone, so I set up a line, configured recording parameters, and began testing. Sure enough – the recording failed on the spare phone.  I also happened to have a 7942 phone, set up an extension and the recording worked just fine.  Note that I had previously examined the endpoint configurations like recording server profile, Built in Bridge enabled, recording calling search space, and recording server setup for the extension.

Thinking this might be related to a SIP versus SCCP issue, I employed the RTMT to see if the audio for the SIP calls was being forked and sent to the recording server. I was able to drill into the SIP call placed to the recording server, check out the Call Flow Diagram, and confirm the recording server was invited to the party.  If you’ve not done this before, just need to log into the RTMT and navigate to Real Time Monitoring Tool -> Voice/Video -> Session Trace Log View -> Real Time Data. While snooping around all the SIP calls to the recording server, I noticed some successes belonging to 8841 phones.  Intrigued that my problem might not be model dependent, I hopped over to the recording server to see which extensions on 8841 phones *did* record successfully.  Which is where things began to make even less sense – only intermittent failures on some 8841 phones in question, others never recorded at all.

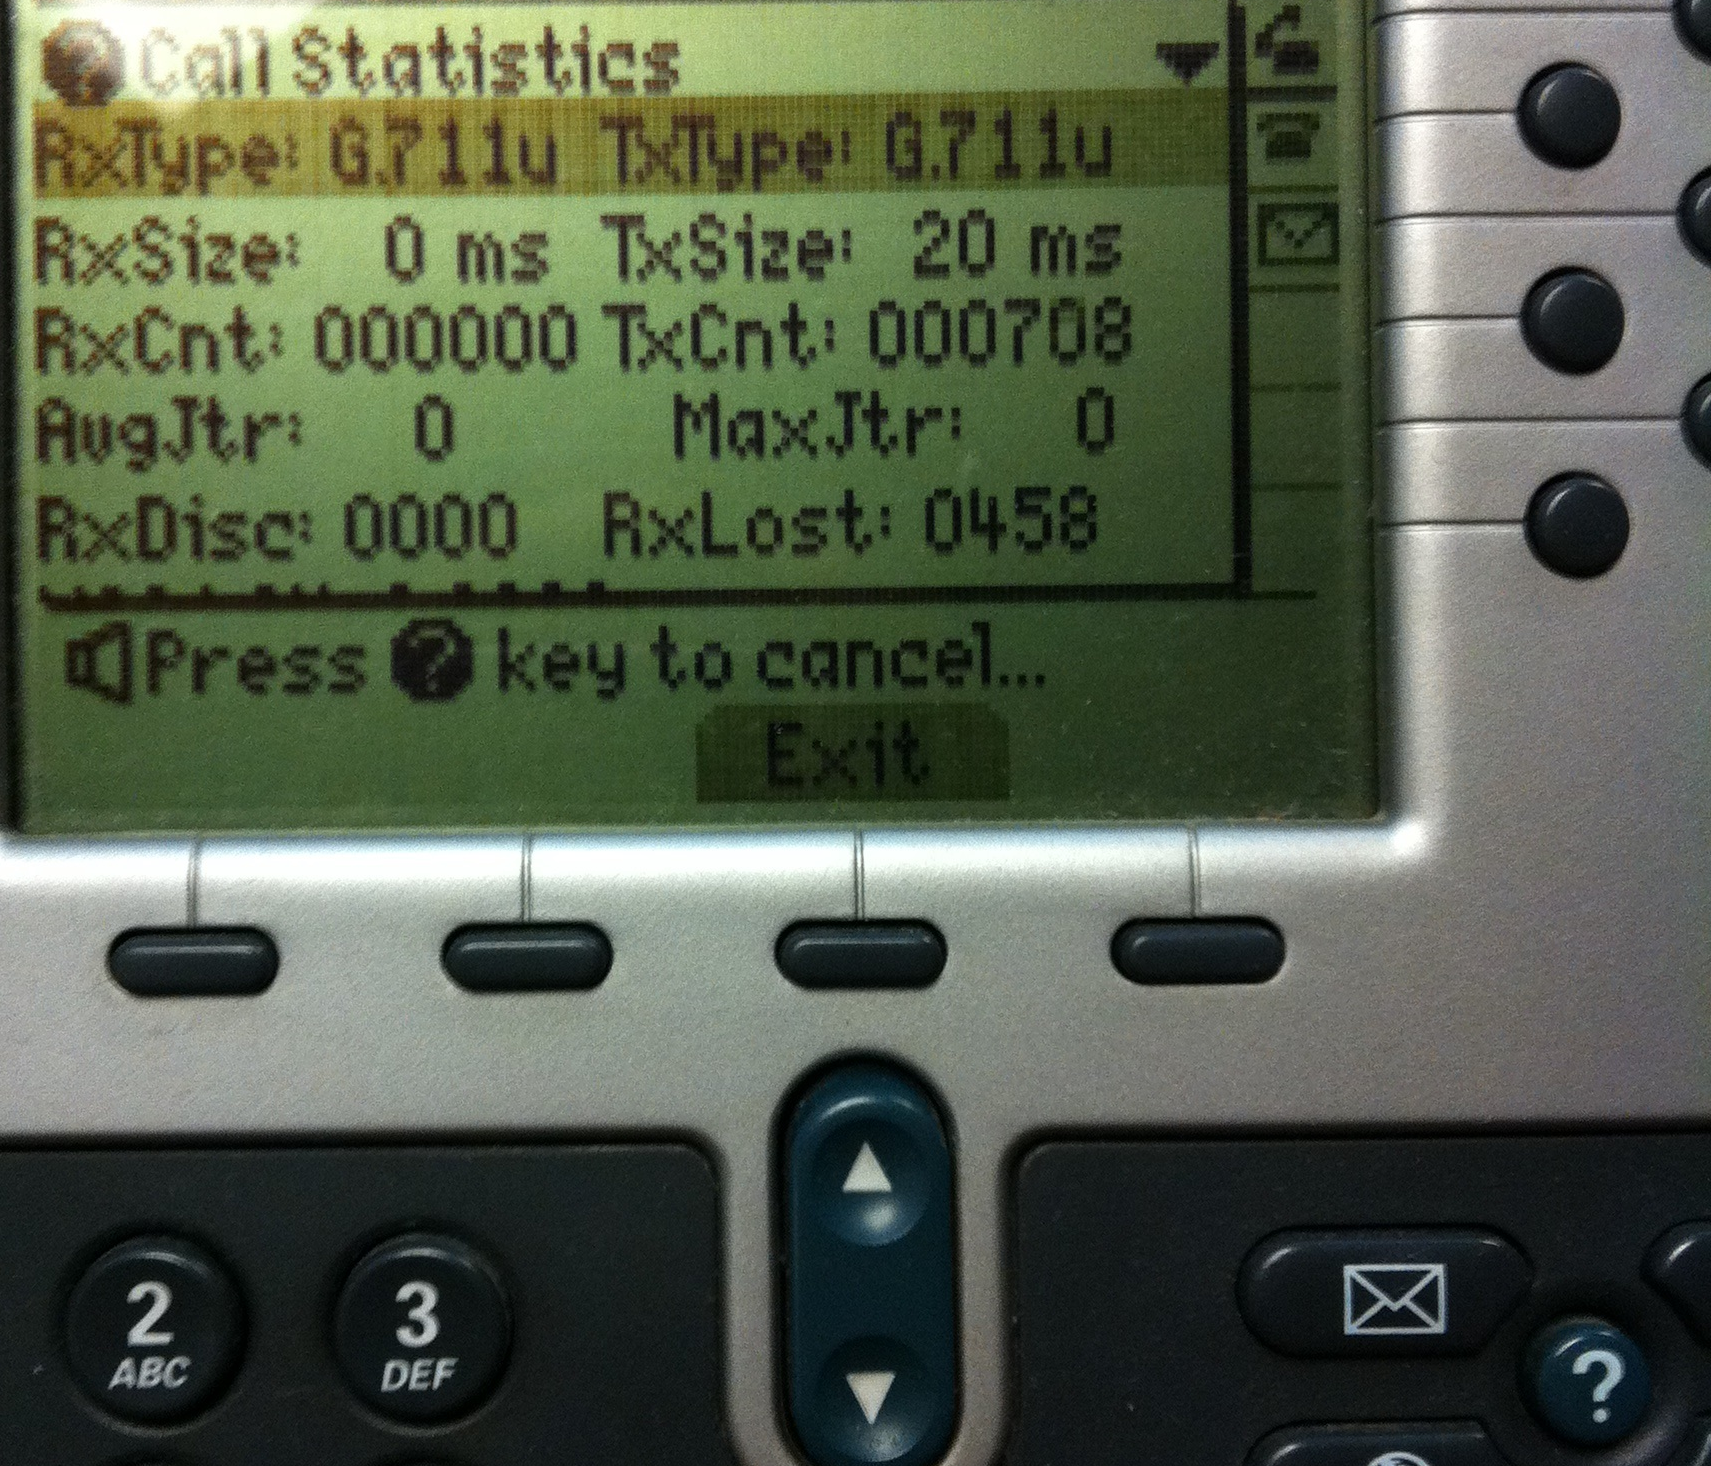
Using my any-excuse-for-a-packet-capture philosophy, I setup two 8841 phone endpoints to allow spanning to PC port and fired up Wireshark.  My test recording failed, but my packet analysis hit pay dirt.  When filtering for RTP, I saw PT=OPUS in the Info column.  Immediately, I had my answer.

I was vaguely aware the Opus codec was a thing, but I previously had no idea that 8841 phones supported the OPUS codec and that CUCM 11.X enabled the OPUS codec automagically (thanks?) – all information I gleaned from this link.

Knowing that recording servers historically hate anything that isn’t g.711 or maybe g.729, I immediately proceeded to follow the instructions from the aforementioned link to find and disable Opus for recorded phones. I previously did this for g.722 many years ago, which is why this solution stung a little, my not being aware there was a new codec on the block and to have preemptively avoided this issue entirely.

from https://www.cisco.com/c/en/us/support/docs/unified-communications/unified-communications-manager-callmanager/200591-OPUS-Codec-Overview.html

While looking at the Opus parameter, I couldn’t help but notice iSAC was new to me as well.  Sifting through my packet captures, I found RTP streams using that codec as well and so disabled it for recorded phones, too.

Below are a couple of screen shots of what you can expect to see in the SIP/SDP packets if you are experiencing this same issue. Hopefully this saves you a bit of leg work should you have some recording failures after an 11.x upgrade.

Feel free to send thanks in the form of flowers, coffee, and cheesecake.

Published 10/18/2018

8841s and line selection woes…

Just a quick post in case there is at least one other person in the world that didn’t know this particular trick for the 8800* series phones that always go off hook on the last line used.  In case you weren’t aware that these phones had this behavior, don’t worry, as soon as you deploy one to a receptionist that handles more than a single phone line, you WILL be made aware. You may not survive the encounter, but you will know…

Should the user let you live long enough to research a solution, you will find that TAC doesn’t offer you any hope in restoring the requisite amount of receptionist happiness to keep oxygen flowing to your lungs. TAC will politely inform you that the phone is operating as designed and that you might want to buy the receptionist some flowers instead.  Okay, maybe that last part was my idea…

Technically TAC is right, you cannot force the phone back to selecting the primary line after hanging up a call that was answered or placed on any of the other lines. However, as my awesomely brilliant coworker discovered, you can change the behavior of the phone so that when calls come in they are DISPLAYED on the primary line.

This way, when the user hangs ups, the phone still has the primary line selected, even if the last call received was for one of the other lines on the phone. This mimics a behavior users have come to know and love of the older generation of phones, a behavior users who manage multiple lines desperately want back.

You can set this option on the phone configuration page, just search for Show All Calls and change the feature to Enabled.

Show All Calls on Primary Line

This won’t make the remembering-the-last-line-selected-for-off-hook behavior go away, but it does make its impact far less noticeable to end users who might otherwise want to plot your demise.

* In this case we were working with 8841 phones, but my coworker has used this trick in the past on 9971 phones, so I’d be inclined to believe this would work on pretty much any SIP phone that has this behavior. 

Published 04/11/2016

The 8945 firmware upgrade dance

For awhile now I’ve been hitting the fabulous issue mentioned in this Cisco forum post for 8945 phones in which the phone basically stops incrementing the time display. Being as I only had a few of these deployed and unplugging/plugging them would fix the issue, I had put off upgrading them. I had plan to put off upgrading the firmware until the proverbial upgrade cows came home and sat around my desk mooing their demands for attention, but unfortunately my plans were udderly derailed*.

I discovered while reading various release notes that the usually cumbersome but predictable upgrade process would be a bit more involved and would need to be done before I started major version upgrades, otherwise my phones would be shiny dialtone-less bricks with no usable firmware to make their happy little phone lives better.

Cutting to the chase, here’s what you have to do if you happen to be in the same series of release boats that I’m paddling around in.  Keep in mind that in this particular situation I am starting with 8945 phones with SCCP894x.9-2-3-5 installed and CUCM version 8.6.2.20000-2, your mileage may vary:

  • You must have the minimum Device Package 8.6.2(22030-1), which in this case I didn’t have. 8941 and 8945 phones won’t register at all if you try to install 9.3(1) or later without this device pack installed first. Yay.
  • Next, you’ve gotta do a step upgrade from 9.3(4) to 9.4(x) because in the grand tradition of voice upgrades being about as much fun as root canals, you can’t just upgrade straight from a 9.2 release to a 9.4 release. Double Yay.

There are a few key things to keep in mind when doing device pack and firmware installations.  First and foremost, always always always read the release notes. If something doesn’t seem clear or make sense, open a TAC case to clarify. This is way better than blowing up your server or phones because you assumed something the release notes didn’t cover or explain properly.

It should go without saying that you should always confirm you have a good backup before doing any file installations at all. I’m saying it anyway, check your backups, never assume they ran. Trust but verify, the emphasis being on verify.

Remember to copy down the values on the Device Defaults page before the upload of the files and to paste in old values if necessary directly after the upload. Check out this previous post for why you will thank me for this later.

Lastly, always remember to reboot after device package installs and to stop/start the TFTP service after firmware file installs.  These processes will save you some heartache and potentially a bruised skull from repeated head-desks when you finally realize you never did stop and start that service and the last 45 minutes of troubleshooting was for nothing.

*Anyone with a beef about my cow puns probably shouldn’t follow me on twitter either, the puns only get worse more fabulous from here… 

Published: 10/23/2014

When simple changes aren’t…tales of MGCP to h.323 conversions

Maintenance windows have a way of reminding you that simple changes aren’t always so simple.

Take a recent after hours task of switching over some MGCP gateways to h.323.  The primary inbound gateway was already h.323 and the MGCP gateways were – well, MGCP – so it made sense to make everything uniform and do the conversion.

So I changed all my calls to route in and out the primary gateway, which was already h.323, and set about making my changes.  In case you haven’t done this before, here is a brief outline of the process – not meant to be a step-by-step, all inclusive list, just a general idea of the process.

On the gateway side:

-set isdn switch type on the router (you can get this from the MGCP configuration in CUCM)
-bind h323 to source interface
-create inbound and outbound dial peers on the router
-remove MGCP bind command and other MGCP configuration (you will need to shutdown the voice port to do this)
-reconfigure the T1 controller
-confirm MULTIPLE_FRAME_ESTABLISHED
-put in place any translation patterns required
-add commands for calling name and/or Facility IE support if required

On the Cisco Unified Call Manager side:

-create the gateway 
-add the gateway to a route group
-add the gateway to a test route list
-create a few route patterns to send calls out the gateway
-add gateway to production route list(s)

My plan was proceeding perfectly up until I needed to send a long distance call out one of the recently converted gateways.  The call received a reorder tone from the carrier even though the debug isdn q931 output showed my call going out with the proper digit format. I knew long distance calls were working going out this gateway before, so I was pretty sure it had to be something with my configuration even though it looked like a carrier issue.  

After comparing configurations with the current h.323 gateway (PRI to the same carrier), uttering a lot of fairly creative yet non repeatable curses, and wasting an hour of my life with a clueless carrier tech who swore I wasn’t sending the 1 required for long distance, the obvious finally hit me.  And it was annoyingly painful.

See, I had made the assumption that long distance calling had been tested out the primary gateway when it was installed.  I foolishly believed that outbound long distance via the primary h.323 gateway had been tested at installation, as this is pretty much standard and *should* be part of any voice gateway install process.  Once I wised up and tested that theory, however, I realized that all long distance calling to the carrier was broken from every gateway, including the old h.323 one which I hadn’t changed anything on.  Knowing this couldn’t be the result of my conversion efforts, I was now able to think through what the real source of the issue could be.

When you send the carrier the right digit format and yet they emphatically insist you most definitely aren’t, you are likely hitting an issue I blogged about in my first ever post.  In some cases, a carrier switch reads your ISDN plan type and takes digit stripping action based on it. They seem to be completely unaware they are even doing it, so don’t expect the carrier to ever discover this is your problem. The solution is simply to set a translation pattern that changes the plan type to UNKNOWN and then the carrier switch doesn’t try to do you any favors and manipulate the digits. Problem solved.

I am now adding testing inbound and outbound calling from ALL gateways before making changes to my check list.  Pass the bourbon please.

Bonus material:
At the time, I didn’t think about the 8945 phones (and newer phones with video capabilities) that often require you add a specific command to the ISDN voice port, otherwise outbound calls from the device fail. I discovered this while finishing up my testing plan and was able to fix it before anyone noticed.  A very good reason to have a thorough testing plan no matter how small the changes being made. Here’s a link to a forum post on this type of issue and the command you need to fix it:

voice-port 0/1/0:23
bearer-cap speech

Also, your lucky day, some commands for calling name when carrier is using the Facility IE:

voice service voip
h323
h225 display-ie ccm-compatible
!
interface Serial0/1/0:23
isdn supp-service name calling
isdn outgoing display-ie

Published 7/2/2014

Voice basics: upgrading firmware for specific phone models

Occasionally in voice world you are required to update firmware for just certain phone types and not others. Say for example you’ve received a batch of those 7945 or 7965 phones that only support 9.3(1)SR1* and you aren’t running that version of firmware on your CUCM yet. There are just a few simple steps and gotchas to watch out for to get this firmware up and running on these phones.

First, hop on over to cisco.com and download the firmware files for CUCM.  In my case, I downloaded cmterm-7945_7965-sccp.9-3-1SR4-1.cop.sgn.**

Save the file to your sFTP directory and launch your sFTP client.  I typically use FreeFTPd, but use whatever sFTP client you are comfortable with.

Now before you go off installing firmware files, there is one crucial step I would always recommend:

Log into CUCM, navigate to Device Settings -> Device Defaults -> [models of phones you are upgrading]

Copy and paste the current value of the default firmware into Notepad or Evernote or whatever program you use that helps keep you from losing stuff.

In this case, I copied SCCP45.9-2-1S which was the default device firmware for the 7945 and 7965 phones.

Next jump on over to the publisher and navigate to OS Administration -> Software Updates -> Install and Upgrade. Walk through the prompts to upgrade from sFTP, select your file, check the MD5 hash, and start the install.

Once installed, repeat the process on the subscribers as well.***

Now at this point, newbies to voice might think that their work here is done, firmware file installation reported complete, so what could be left? Well, it’s voice, it’s *never* that easy.

In this case, the system has actually done you a favor.  If you jump over to CUCM Administration, you will see that the device default fields for your phone models have been updated to the version you have just installed.  Because, however, you have not stopped and started the TFTP service, you have a fabulous opportunity to paste back in your old version value if you would like, before the TFTP service is reset and the system starts upgrading your phones.  I typically copy and paste the new value to Notepad and place the old value back into the appropriate fields. Now I can apply the firmware to a single test phone and not *all* the phones of that model type before rolling the firmware out.  This becomes massively more important when dealing with some of the newer phones and brand new releases of code.

Then it’s over to Cisco Unified Serviceability -> Control Center – Feature Services to restart the TFTP service on each node.

tftpservice

Now, to test your new firmware on a specific phone, find that phone in CUCM and paste the new firmware value into the Phone Load Name field.  Reboot the phone and it should then grab the new version.

Phoneload

Once you’ve established that the new code doesn’t bork your shiny Cisco device, paste the new firmware value into the appropriate Device Defaults field for your phone models. Then all phones of that type will be able to upgrade to that version.

*There are certain 7945s and 7965s shipping now that only support 9.3(1)SR1.  I missed any official announcement but remembering hearing rumors of this at Cisco Live.  The phone will register without you upgrading the firmware files on CUCM, but if you ever reset it to factory defaults, it won’t register again.  At that point, I offer you this help on fixing bricked phones

**It should go without saying, but I’ll say it anyway, always read the release notes and check the compatibility of the file(s) you are selecting. Voice is extremely unforgiving if you choose not to read the fine print.

***Technically you really only need to do this on the server(s) that are acting as TFTP servers, but I like the consistency of all the servers having the files in case one should need to take over that role unexpectedly.

Published 3/4/2014

It’s been mostly dead all day…

Setting a misbehaving phone back to factory defaults is a great way to cure endpoint wonkiness*.  This process successfully eradicates a multitude of demons, but recently my reset results were more of a botched lobotomy than a successful exorcism.  The phone powered on, cycled to the Cisco logo screen, spat out curses about my mother, and power cycled itself again. Cue infinite loop. Please note, it might have been me doing the actual cursing…

So what do you do with a rather expensive Cisco brick besides throw it at well deserving users?

Well, you’ll need a couple of things to pull off this miracle – first, a really large cloak**…nah, only kidding, but you will need firmware files.  Yep, head on over to cisco.com and locate the firmware files for your phone model.  You are looking for the individual files versus the .cop file for CUCM.  In my case, I had a beautiful 7945 brick, so I downloaded cmterm-7945_7965-sccp.9-3-1SR2-1.zip.

You will also need tftpd32 or tftpd64. I guess technically you could use any tftp server application, but this one is free, easy to configure, and I know it works.

All you need now is to build yourself a little network island using a stand alone switch and some patch cables. You will need to provide a DHCP address to your phone with the option 150 set to the IP of your laptop.  I used a small layer 3 switch that I could configure a DHCP pool on.

Next up, configure tftpd32 as a server and place the firmware files in the correct directory.*** Rather than reinvent the wheel, here is a good post on configuring tftp32 as a server: http://www.tricksguide.com/how-to-setup-a-tftp-server-tftpd32-windows.html

Once you have your laptop and the phone in the same vlan with the TFTP server running, you should start to see the magic happen. It should look something like this when your firmware files are being downloaded by the phone:

filetransferbrickphone

This should bring your phone back to the land of the living, if you’re lucky.  But since you are already at this point I am highly doubting your luck, so here is a post with a few more ideas that may help as well: https://supportforums.cisco.com/thread/2007970

Published 12/5/2013

*wonkiness: the term a voice engineer uses to explain the unexplainable behavior of a device that is configured correctly but is clearly possessed by an evil spirit with an extremely vindictive sense of humor.

**Not surprisingly, another Princess Bride reference, just go watch it already.

***Should you forget or not realize what directory your tftp server is set to serve up files from, and yes sadly I am speaking from experience on this one, you can buy yourself a clue in the form of a Wireshark capture.  You should see the file being requested in the capture. If you are seeing a request like the one below, then check the location of the file. If not, check your DHCP bindings and confirm the phone is getting an address with the option 150 set.

term45


PLAR, UCCX, Redirects, oh my…

Typically my UCCX (Unified Cisco Contact Center Express) stories involve much weeping and gnashing of teeth, but here’s one that (mostly) just left me scratching my head for a while.

I got a ticket reporting that a courtesy phone in a lobby was no longer working. After a little digging, I found that this phone was put in place to be a PLAR (private line automatic ringdown) phone, and when users picked up the handset they were greeted with an unfriendly fast busy instead of being courteously and automatically connected to the proper extension.

The phone in question was assigned its own Calling Search Space (CSS) and that CSS contained a single partition with a single translation pattern. This pattern translated “nothing” (meaning the user enters no digits) to an extension, but in typical network discovery fashion, I found that this extension pointed to yet another extension assigned to a different translation pattern and then that was pointed to a UCCX trigger. Yes, because complexity always makes the network run better.

First order of business, simplify. This extra translation didn’t seem likely to be the cause of the issue at hand, but it certainly wasn’t necessary so by pointing the PLAR translation the to UCCX trigger directly I made my life a whole lot easier, which I am a huge fan of doing.

Knowing what I know about UCCX and CUCM hand-offs, I honed in quickly on determining if the CSS of the translation pattern could “reach” the UCCX trigger.  The device calling the UCCX trigger has to have access to the partition the trigger is in otherwise the call isn’t going through, and you’re going to be having a bad day.

In this case, we are actually talking about the CSS of the translation pattern and upon inspection the translation pattern was assigned a CSS that included the partition the UCCX trigger was in.

At this point, I needed to prove to myself that this was a UCCX issue and not a general CUCM issue, so I changed the destination on the translation pattern to my own extension – also in the same partition as the UCCX trigger. Worked like a charm. Definitely looking like UCCX weirdness then…

Quickly tired of grasping at straws, I took some logs from CUCM and threw them into Translator X and Notepad++, both of these tools are awesome and if you are not using them, you should be!

Here’s the line I kept seeing from my CUCM traces, indicating what I first suspected, a CSS issue:

10:03:35.086 |Digit analysis: potentialMatches=NoPotentialMatchesExist

CUCM could not find a potential match for the destination directory number in any partition in the CSS of the translation pattern. Which didn’t make sense. Which is why Contact Center so often makes me wanna cry.

I decided it was time to talk to my excellent friends over at TAC. After reviewing the configuration with the engineer, I was presented with Bug ID CSCso91760* which basically reports that instead of using the CSS on the translation pattern redirecting the call, the hand-off was using the CSS of the originating phone. In our case this meant the CSS being used was the PLAR CSS of the phone – which couldn’t reach anything except that single PLAR translation pattern. Lovely.

The fix was simple enough, though. In UCCX**, just go to the configuration page for the trigger and click the “Show More” button at the bottom.  Then look for Calling Search Space for Redirect under the Directory Number Settings Section. Change the CSS from Default Calling Search Space to whatever CSS you need for the call to go through.

Here’s what you should be looking for in the trigger settings page, you can see that Default Calling Search Space is, well, the default:

redirect

Nothing further required, problem solved. Yay you! Now somebody pass the tissues…

Published July 17, 2013.

*CCO account required

**UCCX version in this case is 8.5, I was too lazy to research if earlier version have this same option box, if you have an earlier version and you don’t see this option, you may want an extra box of tissues.

Where’s my RTP?

As many of my readers already know, I recently shifted gears from a being a consultant focused on voice to a being network engineer focused on…well, everything. One of the first items on my list to tackle, however, put my years of voice training to good use.

A common issue voice engineers are faced with is one way or no way audio.  As a voice consultant, those types of issues almost always ended with my saying the line “that’s a network issue, you’ll need to follow up with *those* guys” because almost always one way or no way audio is a routing issue of some sort. Of course, now that I am again one of *those* guys that gets to fix the routing issue too, that line is not quite as charming.

Many people who do not do voice everyday are not aware of the fact that the actual audio payload of a phone call is RTP traffic sent directly between the two endpoints.  This is starkly different from the call signalling, which is typically between the endpoint and the Unified Communications Manager. Given that signalling and RTP can take differing paths, you can end up with phone calls that seem like they should work but don’t, and for better or worse, the other end cannot hear you screaming in frustration.

My most recent run in with this issue involved a new VPN connection setup and users unable to hear voicemail prompts when checking messages. Complicating the issue was the fact that “normal” phone calls – phone calls between the remote and main site, were working just fine. A closer look, however, easily explained why one was working and not the other.

A good place to start on a no audio issue like this is to make use of the Question Mark button located on most Cisco phones. In this case I was dealing with a 7960 (don’t judge me) and just clicking the Question Mark button twice pulled up stats for the conversation.  Most notably, I could see that the transmit packets were incrementing, but the receive packets were not*. Newer phone models like the 69/8900 series hide this information in some other menu which isn’t entirely obvious, but just check the documentation to see how to pull up phone call stats. You can see in the photo below the type of useful information you can get – note the Question Mark key is in the bottom right of the picture.

phonephoto

Having confirmed that the phone thought it was sending RTP packets, but clearly not receiving them, I decided it was a good time for a packet capture**. One of the things I love about Wireshark is how easy tracking down RTP conversations is in a .pcap file. To take the capture, simply plug into data port on the phone, launch Wireshark, start the capture, and make your test call. Then stop the capture, click on Telephony -> RTP -> Display All Streams. You will see the RTP conversations in the capture, choose the one you want, and then click Prepare a Filter to view just the RTP packets you are looking for. Be sure to wave your hand and mumble “these are the RTP packets you are looking for” while you do.

Once I had my filter applied I could see the two IP addresses that the RTP was attempting to flow between, one being the phone ip address and the other being the ip address of a secondary voicemail server, not located at the main site that the remote phones were typically calling.  I then tried to telnet to that voicemail server on port 5000 to monitor the voicemail port traffic but my connection was unsuccessful, reiterating that I had a routing issue somewhere.***

Capture

Now the conclusion to this episode is not nearly as exciting as the troubleshooting process, adding a route to the VPN configuration to the correct subnet was all that was required, but it serves as a great example of when a voice issue isn’t actually a voice issue, no matter how much it looks like one.

Published 5/25/2013

*Another item to rule out on these types of remote site setups is the possibility of a codec mismatch.  The default between sites is typically g729 and not all voicemail servers can tolerate that.  Using the Question Mark key can show you the codec that is being used and then you can investigate whether or not the proper transcoder resources are in place.

**Pretty much anytime is a good time for a packet capture.

***I did a write up on how you can monitor voice ports with Unity Connection 8.6 using telnet here