Upgrading Unity Connection 9.1.2SU2 to 11.5.1SU2

Prologue: This post is intended as an informative prep document for those planning to upgrade Unity Connection (in an HA setup) from 9.1.2SU2 to 11.5.1SU2 using the OS platform upgrade and not PCD (because reasons…) – your upgrade mileage may vary and likely will. These are notes from my upgrade experience and while many of these steps are universal to the upgrade process, each upgrade is a unique snowflake. Do not use this post as a step by step How to Guide. You will be sorry, and I promise TAC won’t be impressed when you tell them that you followed a process from a blog, even one as awesome as mine.

So let’s get started on this upgrade for Unity Connection 9.1.2SU2 to 11.5.1SU2 – the best document to begin with is the Unity Connection upgrade guide found here. Your best bet is to read it through several times and to not be surprised when you can quote any particular paragraph and page number in your sleep.

Also, reviewing the release notes found here is a must.

Once you’ve read the docs and are starting to put together a plan, here’s some guidance on what that plan should entail:

Licensing. You will need some.  Be sure to order your upgrade through PUT and be sure that your licensing server can handle the version of Unity Connection you are going to.  You may need to upgrade your license server or add license definitions to your licensing server pull this off.

Installing a .cop file. Installing a .cop file for RSAv3 keys is listed in the upgrade guide. Digging deeper into this, if you are at version 9.1.2SU2 (AKA 9.1.2.12901-3), this build contains the same fix as the .cop file.

To quote the release notes for this .cop file:

If you are already running CUCM release 10.x or higher you already have this fix and do not need to install this Cisco Options Package (COP) file. If you are running an
Engineering Special (ES)or Service Update (SU)that already contains CSCua88701you do not need to install this COP file. CSCua88701 is included in: 8.5.1.17123-1 and higher, 8.6.2.24122-1 and higher, 9.1.2.11018-1 and higher.

I skipped the installation of this .cop file per this information and also receiving no errors for the .cop results of the “run cuc preupgrade test” output run before the upgrade. For more details, check out this document.

Confirm ESXi support. You will want to be sure the ESXi version your virtual machine is on is supported for the version of Unity you want to be on, and that information lives here.

Determine OVA changes. This step requires checking here and comparing these requirements to your current virtual machine.You will likely need to change your virtual machine vNIC to VMXNET 3 as VMXNET3 is required. You may need to engage a little VMware PowerCLI magic to pull this off.*  Note, if you need more RAM or hard drive space, TAC says a rebuild of the server is required. I’ve heard rumors of engineers changing the memory but the official stance of support is not to touch that stuffs.

Determine your disaster rebuild strategy(s). I recommend downloading and installing COBRAS, getting it running, and exporting all your data from your voicemail servers. With this data, you can import into a fresh build if it comes to that. You should also be sure to have a good DRS backup, which when restored will have all your settings versus COBRAS which will require you to recreate some settings/features.

For me, the basic flow of the upgrade went something like:

Exported data using COBRAS
Confirmed available space on the common partition, need at least 25 GB – I did not have to change high and low water marks, refer to the guide if you need to.
Confirmed nightly backup
Verified voicemail ports registered pre-upgrade
Confirmed HA and replication status pre-upgrade
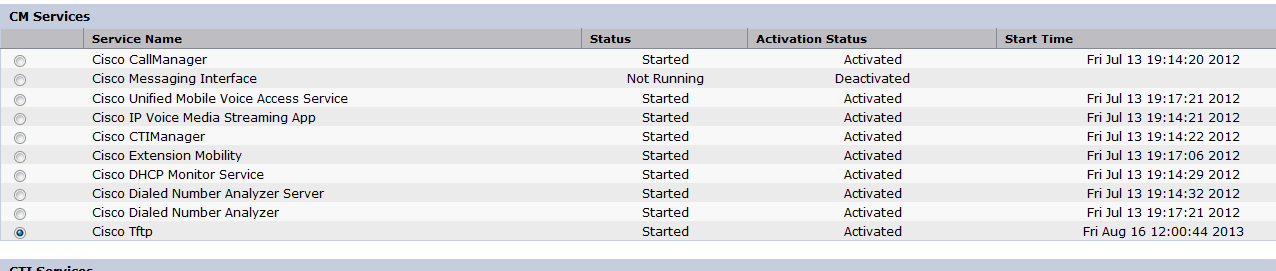
Ran “run cuc preupgrade test”
Chose not to use utils iothrottle disable command since 24/7 production environment – if I had used this command, after entering it, a reboot is required, re-enabling it post upgrade would also be another reboot
Installed upgrade to publisher, automatic switch version required
Waited for services to establish
Installed upgrade to subscriber, automatic switch version required
Waited for services to reestablish and replication to be good
Powered off pub, ran VMware PowerCLI commands to change vNIC
Powered on pub, waited for services to reestablish
Powered off sub, ran VMware PowerCLI commands to change vNIC
Power on sub, waited for services to reestablish
Confirmed replication and tested voicemail box, call handlers, and MWI functionality
Confirmed all voicemail ports registered to CUCM cluster
Checked RTMT tool for any system error messages
Tested call handlers; tested MWI and messaging waiting indicators
Emailed licensing@cisco.com with generated license request from license server, Active SWSS/UCSS contract number, and PUT order number. Requested only Unity licenses only be migrated.

While this upgrade completed successfully without any downtime, I did run into several issues whose resolutions aren’t exactly satisfying.  If you’ve seen these or have insights into them, please leave a comment, I am sure I’m not the only one who has encountered these and would love to hear if others saw and dealt with them.

After the publisher rebooted when the install completed, the secondary’s web interface was a 404 and would not come back even after a reboot of the secondary. This forced the upgrade to be initiated via CLI for the secondary, but the issue went away in the new version.

Both servers after reboots established voicemail services (voicemail boxes available, call handlers working, etc…) in a matter of 10 – 15 minutes, but watching the RTMT tool, the CM platform services go into a CRITICAL DOWN state for about 30 mins, before eventually settling in an up state. Cisco Unified Serviceability was unreachable during this time, but voicemail services were working. No answer from TAC or forums as to anyone seeing this before and if this is going to cause long term issues.

A red DNS warning shows up in the OS administration and CLI for the servers even though DNS is working fine. Some forums suggest that I may have two entries in DNS forwarding, but that hasn’t panned out to be true. TAC suggests it’s a “cosmetic bug” and that since the functionality is clearly working, not to worry about it – yay?

Had to manually stop and restart replication after the power down/up for vNIC changes, hoping this was an after upgrade fluke, but time will tell.

*If you are looking for some VMware PowerCLI magic for those vNIC changes, I offer this – without support or guarantee, only that these commands did the trick for me.

PowerCLI C:\> Connect-VIServer [esxi IP address]
get-vm “servername”
get-vm “servername” | get-networkadapter
get-vm “servername” | get-networkadapter | set-networkadapter -type “vmxnet3”
Get-View -ViewType VirtualMachine -Filter @{“Name” = “servername”} | %{$_.reload()}


Published 1/8/2018

Upgrading UCCX 9.0(2) to 10.6(1)

If you’re wondering about upgrading UCCX from 9.0(2)SU2 to 10.6(1)SU2, and would like that information with a side of snark, then this is the post for you.

Fair warning, this is one of those your-mileage-may-vary entries, definitely do not take my notes as gospel because I promise *I* won’t be the one restoring your UCCX server from backup at 3am.  Always read the release notes and upgrade guides in their entirety, skipping pages earns you nothing but (more) pain and suffering.

That being said, there’s a few important compatibility matrices you will want to check for this upgrade.

Pay close attention to whether your UCS can handle later versions of ESXi without UCS upgrades. For instance, 10.6 no longer supports ESXi 4.X, so you might have some pre-upgrade UCS work to be done before the real party gets started. If you are unsure about your UCS/ESXi version compatibility, try this link for checking.

UCCX 10.6 upgrade from 9.0(2) does require a .cop file, I used ciscouccx.refresh_upgrade_v1.9.cop.sgn.

Before beginning this process, I highly suggest taking a screenshot of your licensing, sacrificing a couple of chickens, and making sure you have ordered your upgrade license through the PUT tool. Voice engineering breeds much in the way of paranoia, so I also recommend downloading the scripts and prompts, just in case you get the additional fun of rebuilding the server from scratch. It should go without saying, but I’ll say it anyway, be sure to check that your backups have been running AND that they have been running successfully.

The order of operations goes something like this for an HA setup, note that there is no Finesse deployed in my setup, strictly CAD.

  • Confirm the primary is active and all services show IN SERVICE – don’t skip this, I’ve never tried to upgrade in an active failed over state, but I imagine it’s like crossing the streams and would end in much badness.
  • Install .cop file on the primary, reboot, grab coffee, wait for services to come back up
  • Install .cop file on the secondary, reboot, grab moar coffee, wait for services to come back up
  • Install upgrade file to primary, drive to a different county to get coffee, don’t panic when the server reboots during the installation, and do not reboot after install.
  • Install upgrade file to secondary, switch to vodka. Question life choices to get involved in voice engineering.  Do not reboot after install.
  • Switch versions on the primary. There’s more than enough time at this stage to continue questioning your life choices. All of them.
  • Server (finally) boots to new version. Wait for services to start. The docs say this could take up to 30 minutes. Shouting profanities at the server will not shorten this interval significantly, but you’ll likely try anyway.
  • Log into the server, install license file, note the error message about OVA template issues. Shut down the server because seriously, who needs that kind of negativity in life? Or shutdown because you need to make changes to the OVA. Whichever…
  • Modify OVA template for RAM, OS, and vNIC changes*
  • Power on server, wait for services. Yes, again.
  • Switch versions on the secondary, repeat the process above, pour another glass of whatever is left.
  • Once the primary and secondary are both online with all services show IN SERVICE, check that replication status is good. 
  • Run the client configuration tool and test your queues.  Buy a lottery ticket if you haven’t had to call TAC,by this point.**

The above list is strictly an overview, but gives you a reasonable idea of what to expect during the upgrade. A whole lot of proper planning will result is a whole lot of waiting for things to happen, but not much else.  An uneventful voice upgrade is an awesome voice upgrade.


*Things got interesting with this. During the planning stages, TAC sent me a link to the procedure for altering the OVA, related to Bug ID CSCut04158. This detailed the process to change the vNIC to vmxnet3. When I presented the process to my virtualization guru, he concluded it would not work for our configuration, we would have to use some PowerCLI magic instead. And by we, I mean he. He used PowerCLI magic, I just threw another chicken onto the alter. The code went something like get-vm MyServerName | get-networkadapter | set-networkadapter -type “vmxnet3” – use this suggestion at your own risk, I am not a virtualization expert, nor do I play one on TV. 

**I will point out that in the upgrade guide, an error about unaligned partitions is called out as a potential issue – it sounded like a whole lot of no fun resulting in rebuilding from backup, and I was quite relieved I didn’t hit that one. Did I mention read the docs?  Definitely do that…

Published 08/16/2016


Voice basics: upgrading firmware for specific phone models

Occasionally in voice world you are required to update firmware for just certain phone types and not others. Say for example you’ve received a batch of those 7945 or 7965 phones that only support 9.3(1)SR1* and you aren’t running that version of firmware on your CUCM yet. There are just a few simple steps and gotchas to watch out for to get this firmware up and running on these phones.

First, hop on over to cisco.com and download the firmware files for CUCM.  In my case, I downloaded cmterm-7945_7965-sccp.9-3-1SR4-1.cop.sgn.**

Save the file to your sFTP directory and launch your sFTP client.  I typically use FreeFTPd, but use whatever sFTP client you are comfortable with.

Now before you go off installing firmware files, there is one crucial step I would always recommend:

Log into CUCM, navigate to Device Settings -> Device Defaults -> [models of phones you are upgrading]

Copy and paste the current value of the default firmware into Notepad or Evernote or whatever program you use that helps keep you from losing stuff.

In this case, I copied SCCP45.9-2-1S which was the default device firmware for the 7945 and 7965 phones.

Next jump on over to the publisher and navigate to OS Administration -> Software Updates -> Install and Upgrade. Walk through the prompts to upgrade from sFTP, select your file, check the MD5 hash, and start the install.

Once installed, repeat the process on the subscribers as well.***

Now at this point, newbies to voice might think that their work here is done, firmware file installation reported complete, so what could be left? Well, it’s voice, it’s *never* that easy.

In this case, the system has actually done you a favor.  If you jump over to CUCM Administration, you will see that the device default fields for your phone models have been updated to the version you have just installed.  Because, however, you have not stopped and started the TFTP service, you have a fabulous opportunity to paste back in your old version value if you would like, before the TFTP service is reset and the system starts upgrading your phones.  I typically copy and paste the new value to Notepad and place the old value back into the appropriate fields. Now I can apply the firmware to a single test phone and not *all* the phones of that model type before rolling the firmware out.  This becomes massively more important when dealing with some of the newer phones and brand new releases of code.

Then it’s over to Cisco Unified Serviceability -> Control Center – Feature Services to restart the TFTP service on each node.

tftpservice

Now, to test your new firmware on a specific phone, find that phone in CUCM and paste the new firmware value into the Phone Load Name field.  Reboot the phone and it should then grab the new version.

Phoneload

Once you’ve established that the new code doesn’t bork your shiny Cisco device, paste the new firmware value into the appropriate Device Defaults field for your phone models. Then all phones of that type will be able to upgrade to that version.

*There are certain 7945s and 7965s shipping now that only support 9.3(1)SR1.  I missed any official announcement but remembering hearing rumors of this at Cisco Live.  The phone will register without you upgrading the firmware files on CUCM, but if you ever reset it to factory defaults, it won’t register again.  At that point, I offer you this help on fixing bricked phones

**It should go without saying, but I’ll say it anyway, always read the release notes and check the compatibility of the file(s) you are selecting. Voice is extremely unforgiving if you choose not to read the fine print.

***Technically you really only need to do this on the server(s) that are acting as TFTP servers, but I like the consistency of all the servers having the files in case one should need to take over that role unexpectedly.

Published 3/4/2014

Upgrades 101

I find the upgrade research process far more entertaining if you approach it like a less than ideal scavenger hunt – a poorly planned, slightly brutal game of talent and luck- mixed with just a pinch of despair.

In this example, which will not begin to cover all the ways/paths/routes you can go for an upgrade, we will take a common scenario and walk through the basic research process. This is more to outline the process and things you should be checking rather than trying to be a comprehensive list of links for upgrades.

I apologize in advance for all the links in this post that will inevitably become dead after a matter of time, but there’s only so much in the universe I can control. Also, I shouldn’t have to say this, but ALWAYS check the latest versions of the documentation – things change – but it’s highly unlikely I’ll modify this post to reflect it.  I’m just lazy that way.

Let’s say in our example you have 5 unified communications servers in your cluster and are looking to upgrade to the latest & greatest versions of each product:
2 Call Managers – MCS7825-H3 with 2×160 GB drives and 2 GB of memory running 7.1.3.20000-2
1 Unity server – MCS7825-H3 with 2×160 GB drives and 2 GB memory running Unity 8.0
2 UCCX servers – MCS7825-H3 with 2×160 GB drives and 2 GB memory running 7.0(1)SR05_Build504

Let’s start with determining the upgrade path for your Unity server:
In case you have been living under a rock, the reign of tyranny Unity has enjoyed over voice engineers has been given an official end date, so if you are looking to upgrade your voicemail server, Unity Connection is the way to go.  The breeze with which this product installs in comparison to it’s predecessor will make you want to kiss your mother-in-law and hug your neighbor’s yappy little dog.

Step one in the Unity Connection research process is to determine your hardware compatibility. In this case, you get to play the find-your-server-model on the Big Long List ‘o Compatibility for the version you want to go to – in this case I pulled up the compatibility list for 8.x of Unity Connection: http://www.cisco.com/en/US/docs/voice_ip_comm/connection/8x/supported_platforms/8xcucspl.html

In our current example, you can see that this model of server is supported for versions of Unity Connection 8.x.   Yay, you! Specifically, it’s supported for Platform Overlay 1 which requires 4 gig of RAM and 2 250 gig drives.

We will want to confirm that our proposed Unity Connection version is compatible with both our current version of CUCM and our proposed upgrade version of CUCM – this typically isn’t an issue since Unity Connection plays very nicely with almost all versions of CUCM, but definitely a check you want to make: http://www.cisco.com/en/US/docs/voice_ip_comm/connection/compatibility/matrix/cucsccpmtx.html

In the case of Unity Connection upgrades, you are going to want to look closely at the DiRT tool and the COBRAs tool to make the transition from the old to the new – there are excellent tutorials/instructions/information on this web page: http://ciscounitytools.com/

Moving on, let’s tackle the process of determining the upgrade path for CUCM:

Step one is once again to determine your hardware compatibility.  Find your model of server on this chart clearly constructed by evil forces seeking to wreak havoc on the universe: http://www.cisco.com/en/US/prod/collateral/voicesw/ps6790/ps5748/ps378/prod_brochure0900aecd8062a4f9.html

Note that if you actually want to see your server model AND the headers at the same time, you are just out of luck unless you have a really, really large monitor or can read really, really tiny font. I’ve been known to take a screen shot of the header row and a screen shot of my server model row and line the two up. The entire time chanting curses upon the chart creators.*

As you can see, our example server does support CUCM 8.6 but there is both an X and a (2).  If you look at the sub notations on this already freaking fabulous chart (note sarcasm font), you will see indicators that while this server is supported, there are certain memory and hard drive upgrade considerations.

In this case, our sample server meets the hard drive specs (160 GB drives), but is going to need an extra two gig of RAM to make the leap into hyperspace. One note here, be sure to watch out for servers that are supported only for bridged upgrades – this means you can take the server up to the latest version, but the only thing it’ll be good for is to take a backup that can be restored onto a supported server. That, and I’m sure it makes a really useful, if somewhat noisy, door stop.

Once you’ve confirmed hardware compatibility of your CUCM servers, you will need to check your upgrade path.  Even though ideally you would like to go directly to the latest and greatest CUCM version, unfortunately you may run across a you-can’t-get-there-from-here scenario – especially if you are looking at upgrading from versions of 6.x.  In our sample case we are looking to go from 7.1.3.20000-2 to 8.6.2.  Time to pull out the magic eight ball.  Nah, actually, just use this document:  http://www.cisco.com/en/US/docs/voice_ip_comm/cucm/compat/ccmcompmatr.html#wp373165

Note that you will likely need to know what your full version number translates to in SU-speak, in this case 7.1.3.20000-2 is actually 7.1(3a).  What you are looking for is your release in SU-speak under the Direct Upgrade column of the release you want to go to. If it’s not there, you are going to get to do a step upgrade – intermediate upgrades FTW! (sarcasm font again)

Be sure if you find yourself in this situation to pick a stable intermediate version.

The last piece of our CUCM cluster upgrade is UCCX (formerly IPCC):
Step one is, of course, to check the hardware compatibility, and there’s a doc for that: http://www.cisco.com/en/US/docs/voice_ip_comm/cust_contact/contact_center/crs/express_compatibility/matrix/crscomtx.pdf

This document may make your head spin a little, but first look for the version of UCCX you want to go with, in our case 8.5(1). Then check and see of your server makes the cut.

In our example case, we do make the cut – our version of UCCX 7.0(1)SR05_Build504 is even listed under supported upgrade paths- BUT looking at the document closely, UCCX 8.5(1) isn’t supported with our current CUCM 7.1.  Welcome back step upgrade.  You will need to keep your UCCX and CUCM versions compatible, so upgrading to UCCX to 8.02 then upgrading CUCM to 8.6, then upgrading UCCX to 8.5(1) will do the trick. And lead to excessive drinking.

Note, however, that our example CUCM version is not explicitly listed in the chart- only 7.1(3) and 7.1(3b) – so if it were me, I would confirm with Cisco support that 7.1(3a) indeed did support UCCX 8.02. Make no assumptions when it comes to the documentation- ever.

After you’ve survived all of this, I’d say your about 1/2 way through the research process.  Among other things, you will still need to review the release notes for each application, check for COP file requirements, check the prerequisites for each proposed version, and confirm phone firmware compatibility. You will also need to check third party application support for all your extra voice applications**, determine the order in which the upgrades need to happen, and review detail over again***.  You’ll also need to determine down times and back out options should upgrades not go as planned. Of course upgrades always go as planned, right? (sarcasm font at it’s finest)

This will get you started on your hardware check, help determine if you need to invest in new servers, and give you an idea of what version you should be targeting and what it’s going to take to get your hardware there.

*To say I hate this chart with the passion of a thousand suns is a woefully pathetic understatement. If it burned in the fires of Hades for all eternity, that wouldn’t be long enough.
**Be sure not to forget to check the compatibility for your Presence servers, your CER servers, your recording servers, your paging servers, your fax servers, your voice gateways, your legacy PBX, and anything else that integrates with CUCM
***Note that in some cases you may actually lose some functionality your users are dependent on, specifically I would mention the loss of built in Attendant Console when making the jump to CUCM 8 and above. Double check everything for gotchas and caveats, it’ll save your arse and your upgrade.