Preserving and managing intent using Apstra AOS

Apstra’s Networking Field Day 16 presentations highlighted key issues engineers face every day.  The traditional ways of spinning up configurations and validating expected forwarding behavior falls short of the needs of networks of any size. For anyone who has encountered a network where the documentation was woefully outdated or practically non-existent, and whose design requirements and purpose were deduced purely from rumors and vague supposition, Apstra offers AOS and its Intent Store.

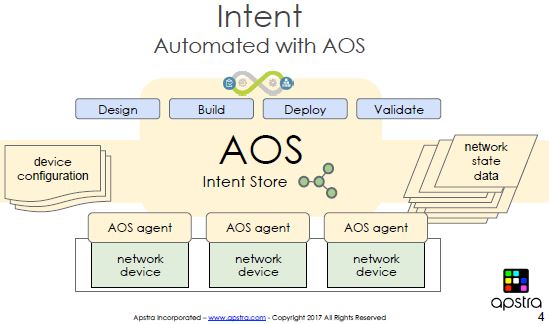
More than just configuration management, the idea of Apstra is to manage not just the building of consistent configurations abstracted from the specific hardware, but also to provide a controlled manner in which to address and manage network design revisions throughout the network’s life cycle.

Changing business needs impart necessary modifications to device dependencies and performance, Apstra addresses these revisions by maintaining a single source of truth – the documented intent* – and providing tools to validate this intent.  As Derick Winkworth said “it’s about moving the network [design] from being all in someone’s head” to making the design something consistent, tangible, and best of all, something that can be queried, and by extension, verified.

Under the covers, Apstra makes use of graph theory, and for those who’d rather not Google that, the upshot is nodes get added and relationships get tied to nodes.  The structure allows for a flexible schema that lends itself to ever-changing quantities of connections and also to new types of inter-dependencies between objects.

For example, Apstra added the ability to create links between network nodes and the applications that run through them.  This is done through some DevOps wizardary which this video highlights well, and the additional relationship mappings allow the network operator to query for application paths and diagnosis traffic flow issues.

For a short how-is-this-useful-to-me, I highly recommend this explanation by Damien Garros on using Apstra to shorten the time it takes to deploy crazy amounts of security zones, validate them, and monitor them. Snazzy stuff for any engineer who has ever faced a security auditor.


Disclaimer: While Networking Field Day, which is sponsored by the companies that present, was very generous to invite me to this fantastic event and I am very grateful for it, my opinions are totally my own, as all redheads are far too stubborn to have it any other way.


*Intent is all the buzz these days, back in my day we called it policy or design requirements. But I’ll try to avoid waving my arms and shouting get off my LAN… 🙂

Published 9/25/2017

Minor version upgrades for Aruba controllers, version 6.5.x

If you tuned in for the last post, you’ll remember that in all the wireless mesh troubleshooting fun, a wireless controller upgrade was required.  Today’s post outlines the upgrade process from 6.5.0.1 to 6.5.1.7 with a primary and secondary controller. As always when dealing with upgrades, your mileage may vary. Never forget to read the release notes, and when in doubt, contact TAC.

As with any upgrade, the release notes often contain subtle details, and these are typically details that bite back if you miss them.  The notes for 6.5.1.7 are pretty straightforward, but they do include exciting, not to be missed, caveats if upgrading from 6.4.x, as well as some solid tips for the upgrade.

The best practice advice in the notes includes steps such as confirming enough memory and storage space for the controller, making a backup of the configuration, and noting the number of active access points before upgrading. All of these suggestions make prudent sense and the commands to do so are listed in the guide.

You can use a FTP, TFTP, SCP, local file, or USB to do this upgrade, but the guide warns against using a Windows-based TFTP server. I used FileZilla FTP server.

Once you’ve downloaded the image file from Aruba and your pre-upgrade checklist is complete, navigate to Maintenance > Controller > Image Management -> Master Configuration.

Pick the file loading option you want to use for the upgrade, then fill in the required details for the transfer. Choose the non-boot partition for Partition to Upgrade. This will load the new software image to the inactive partition. If you are uncertain which one is the boot partition, look under Current Partition Usage, one partition will be marked **default boot**. You will want the other one.

Be sure that Reboot Controller after Upgrade is set to No, unless you have a single controller and eat danger for breakfast. Select Yes for Save Current Configuration Before Reboot, and click Upgrade.

At this point, you rinse and repeat for the other controller(s).  Once the controllers have the upgrade version loaded, you reboot the master, and simultaneously reboot the other controller. In voice upgrade world, you have been well trained to wait FOREVER for all the services to come back up on the primary before even considering a reboot of secondaries, but in Aruba wireless world, simultaneous is written in the guide. See excerpt below from the 6.5.1.7 Release Notes available on the Aruba support site.

TAC did ease my anxiety over this simultaneous reboot thing by letting me know no harm would be caused if I wanted to wait for the master to come back online completely before proceeding.

After the controllers reboot and are back online, access points begin getting their new firmware and rebooting. Once the dust settles, you should end up with the same number of active APs as you noted in the beginning. Then it’s all testing and confirming access points are happy, clients are connecting, and that all is well your WiFi world.

Published 9/11/2017

Wireless troubleshooting – mesh access points stop accepting clients

Today’s topic initially spawned from mesh troubleshooting.  If you’ve worked with mesh much, you may have just thrown up a little and are frantically trying to close the browser tab that led you here, and that’s totally understandable.  For my voice engineer readers, mesh troubleshooting is one of the few things in the universe that can generate pain and suffering in levels akin to troubleshooting fax machines.

Given typically vague rumors and incomplete reports of intermittent connectivity issues at a mesh site, my amazing coworker was able to hone in on the root problem: various APs in the mesh intermittently stopped accepting clients on their 2.4 GHz radios. Being as 5 GHz was limited to back-haul traffic only, this was definitely wreaking some havoc on the overall deployment.

From the controller, disabling and re-enabling the radio on the 802.11g radio profile* for the affected APs served as a workaround while TAC was consulted. Mysteriously, other mesh deployment sites with the same model AP and code were not seeing this issue. As a note, these APs were all Aruba 274s and controller code version 6.5.0.1, but spoiler alert, the model AP wasn’t the issue.

Fast forward to TAC and some show/debugs commands later, the APs that randomly stopped accepting clients had enormous amounts of 2.4 radio resets, indicating this bug discussed here.

This issue affects not only 274s, but other models of access points. The bug does not appear to affect all of any model, just a small percentage of access points when it does show up.

If you think you might be experiencing this issue, take a look at the output of these commands and look for a crazy high number of radio resets.  How high?  Since the radio appears to be resetting practically every second, the radio reset number is noticeably and ridiculously large.**

show ap debug radio-stats ap-name NAME-OF-AP radio 0 advanced
show ap debug radio-stats ap-name NAME-OF-AP radio 1 advanced
show ap debug system-status ap-name NAME-OF-AP

The fix is in code versions 6.5.0.4 or 6.5.1.3 or later.  We landed 6.5.1.7 and the issue looks to be properly squashed. The upgrade process, which I’ll outline in another brief post, was a simple and straightforward, and being a veteran of many a lengthy and challenging voice upgrades, I found this to be refreshingly delightful and far less sanity taxing.

* Enabling the radio can be done on the 802.11g radio profile, on the Basic tab.  Uncheck the Radio enable box, click Apply.  Check the Radio Enable box, click Apply.  These mesh APs each have their own AP specific profile and this action only affects the individual AP.  If your AP doesn’t have an AP specific profile, be sure to know what APs you are impacting when you do this. Also of note to this case, some experiencing this issue found disabling ARM provided temporary relief, but didn’t do the trick in this deployment, as ARM was already disabled and the issue still occurring.   

Radio enable

**Below is an example of the number of resets seen for one of the affected APs:

Interface Rx_pkts Rx_errors Rx drops Tx_pkts Tx_errors Tx_drops Resets
——— ——- ——— ——– ——- ——— ——– ——
wifi0 174210795 15727807 0 451900531 103 0 9
wifi1 9166677 133711103 0 32655175 842870 0 211094


Published 09/05/2017